Sunday, May 23, 2010

Profiteroles with Orange Blossom Pastry Cream


My love affair with profiteroles started almost 16 years ago (yikes!) when I first started working at I Tre Merli as a bartender. On the menu they had a dish called Bongo Bongo, which consisted of profiteroles filled with ice cream and topped with a warm chocolate sauce. The dish was simple, yet it was amazing, and for some reason I was never able to find it anywhere else. Every time I saw profiteroles on a menu I got excited and inevitably when I ordered the I was always disappointed because the pastry chef, however talented he may have been, overcomplicated the dish by adding weird fillings and sauces. For this reason, as usually happens when I cannot find a dish the exact way I want it, I decided to make it myself.

The first time I made profiteroles I was scared and did not think that I would be able to recreate those puffs of joy, but I can assure you that they are not hard to make. The nice thing about profiteroles is that they are versatile and never cease to impress. You will need to familiarize yourself with the use of a pastry bag, but this is a skill that you will be able to use time and time again. Once mastered you can make savory gougeres, a.k.a cheese profiteroles and other delectable treats.

Although you can cut the profiteroles in half and fill them with ice cream and top with chocolate sauce, the profiteroles in this recipe have been filled with pastry cream. The pastry cream is inspired from a dessert at Tabla, Chef Floyd Cardoz’ restaurant in Gramercy, which consisted of beignets with an orange blossom dipping sauce. The flavors at this restaurant are inspiring and you cannot help but think about how you can incorporate them into your next dish.

Pate a Choux

1 stick of butter

1 cup of water

1 tsp of sugar

½ tsp of salt

1 cup of flour

4-5 large eggs


In a heavy bottomed saucepan bring to a boil the butter, water, sugar and salt. Remove from the heat and add in the flour. Stir with a wooden spoon until incorporated and then return to the heat and cook for 3-4 minutes, while continuously stirring, until the dough starts to pull away from the sides of the pan and leaves a light residue on the bottom of the pan.

Remove from the heat and add the dough to a stand mixer with the beating attachment and beat on low speed for 2-3 minutes until slightly cool. On medium speed, one by one, add the eggs until fully incorporated. Beat for a minute on medium speed. When done the batter should create a string when the beater is lifted from the bowl. (See photo below). If the consistency is not right, beat the last egg with a little water and add a little at a time until you get the right consistency.

Transfer the mixture to a pastry bag with a pastry tip and pipe into little circles as in the photo below. Use your discretion with the size of the pastry tip you want to use. If I want to make larger pate a choux for a dinner party, I will use a larger tip, for larger groups, I will make smaller ones.

When filling my pastry bag I find it useful to place the bag in a large glass and pull the bag over the sides of the glass to stabilize before I fill. Otherwise everything goes all over the place and I get more of my filling on the floor then in the bag.

You can brush the pan with butter, but I find it easiest to use a Silpat (in my amazon.com store below).

After finished piping, flatten the tips (see below) with an egg-water wash. I usually use the leftover egg mixture that I added to thin the pate a choux batter.

In a preheated oven bake the profiteroles at 400 degrees for 20 minutes and then reduce to 350 and cook until the are golden brown. This usually takes another 10-15 minutes. Cool completely before you fill with the pastry cream.

Pastry Cream

2 cups milk

3 egg yolks

¼ cup honey

¼ sugar

pinch of salt

3 Tbs plus 1 tsp cornstarch

2 Tbs unsalted butter cut into pieces

2 tsp orange blossom flower water

1/3 cup heavy whipping cream


Heat milk, honey and salt to a simmer over medium heat and set aside. In a separate bowl beat the sugar, egg yolks and cornstarch one tablespoon at a time, fully incorporating each tablespoon before you add the next.

In a low stream add half of the milk to the egg mixture to temper. (Err on the side of caution when you first learn this technique and incorporate a little of the heated milk slowly or else your eggs will scramble.) Return the egg-milk mixture to the remaining milk and bring to a boil over medium-high heat while continuously whisking until the custard thickens.

Remove from the heat, whisk in the butter one piece at a time and then add the orange blossom water. Place in another bowl and line the surface with saran wrap so a skin doesn’t form. Chill in the refrigerator for at least a few hours.

When ready to assemble whip the heavy cream until soft peaks are formed and fold into the pastry cream to lighten. Fill a pastry bag with the mixture, as described above, and pipe through the bottom into the profiteroles. Top with powdered sugar.

You can find orange blossom water at most gourmet markets, Middle-Eastern stores, or in my store on amazon.com below.

For step, by step photos and more pastry arts techniques, check out http://www.joepastry.com/.


Tuesday, May 18, 2010

Thea and Lineka's Filipino Brunch


Lineka Rocking The Electric Wok and Making Garlic Rice


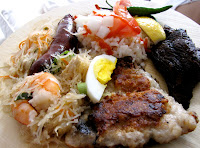
Anyone that knows me will attest to the fact that I rarely relinquish control of my kitchen. Several weeks ago, however, I broke my own rules and allowed my two dear friends, Lineka and Thea, to take over my kitchen and prepare a magnificent Filipino Brunch! The food was Devine, as was the company. The menu included cantaloupe juice, beef tapa, fish daing, ponsit, garlic rice, green papaya salad, several types of longanisa and various condiments and sauces.

It was my first time eating Filipino food and I will definitely be going back for more. Since the food of the Philippines has been influenced by many other cultures, you are never bored and the palate in constantly stimulated. So as not to forget this delicious food, and a super great day, I convinced Thea and Lineka to each contribute a family recipe so you too can have a Filipino Brunch!


(Left, Thea scooping out the contents of a cantaloupe with a fork for a refreshing juice. Traditionally only water and sugar are added, but we decided to also go with vodka which definitely got the party started.)


Thea's Tapa:

2 lbs London broil, sirloin or short ribs (short ribs are Thea’s preference).

Marinade: 1/3 cup soy sauce, 5 tablespoons of brown sugar and 4 cloves minced garlic. (Alternately you can use salt and regular sugar in 1 to 4 ratio but Thea finds its more flavorful with the soy sauce and brown sugar. I have also seen some recipes that call for the addition of plum wine and/or rice wine vinegar.)

Cut meat in thin slices at 30 degree angles and marinate for 24 hours. The next day grill or pan fry. Serve with garlic rice, longanisa, a fried egg and tomato-onion compote referenced below.


Lineka’s Garlic Rice: (image above) fry minced garlic (to taste) in olive oil and add pre-cooked rice. Stir to combine and add salt to taste. Lineka recommends adding some garlic powder to the water that you cook the rice in for extra kick. She warns that this version may best be eaten alone and definitely not before a first date.


Lineka’s Directions/Comments on Longanisa:

Longanisa can be found at any large Asian grocery store in the frozen section. Usually, they come in packs of 8 and you have a choice of regular, sweet, or hot and, if lucky, a selection of pork, beef, or chicken. Traditionally, longanisa is made up of pork (wild boar)...and with all the typical sausage cuts (cheeks, snouts, tails, etc). I've read that, because meat grinders were not readily available in the Philippines back in the day, all meat had to be chopped by hand, so a traditional longanisa filling should be chunkier than a kielbasa or a merguez sausage. That is really what gives longanisa its character.

To cook place frozen sausages in a sauce pan, fill with water, and bring to a boil (there's no need to let them thaw). Boil for about 8-10 minutes, depending on package directions. Then place in a non-stick fry pan with just a small bit of olive oil (the sausages will give off their oil as you cook) and cook, turning frequently, until browned, about 8-10 minutes.


Tomato-Onion Compote: Dice several ripe tomatoes and yellow/Spanish onions. How you make yours depends on your personal taste. Lineka's family likes a to 2:1 tomato to onion ratio, but it can also be 1:1 if you like onions. Place in a small bowl and add white or cider vinegar (or a mix of both) halfway up the bowl. Lineka also likes to add a little bit of patis (fish sauce) for saltiness. If you aren't hard core, you can just use a pinch of regular kosher salt. Let rest for at least 30 minutes so it can soak up the vinegar.

For additional Filipino Recipes please see, Memories of Philippine Kitchens. My friends say it's great and you can find it in my Amazon.com store below. It also is on my “Wish List,” hint, hint, if anyone is looking to buy me an early Christmas present.

Kainan na!

Friday, May 14, 2010

NYC Food Film Festival


For those of you who think that all my posts will be voluminous and long winded, the following is in your honor. Today at noon (ok I am a little behind) tickets went on sale for the NYC Food Film Festival! I just learned about this festival earlier this month through an article in Edible Manhattan. I am super excited since there is nothing I like more than eating and learning about food! Although I tried to get free tickets for the "Food Truck Drive-In Movie", I found out too late and unfortunately all the free tickets were "sold out." :( Since I am too broke to buy tickets, I plan on taking my iPod to Battery Park City and sitting in front of a Halal cart and pretending I am there. Sad I know, but all is not lost since I am pleased to announce that I have just secured four tickets to the "Edible Adventure; Smokes, Ears and Ice Cream Event!" If anyone wants to join me, is interested in other tickets, or simply wants to find out more about the event, get on it and follow the link below!


I would also like to give a shoutout to the people at the NYC Food Festival, who are super nice and were kind enough to provide me with their logo.

Wednesday, May 12, 2010

My Favorite Vietnamese Restaurant


There are many reasons why I love my husband, but one in particular is because he introduced me to Brazilian and Vietnamese cuisine. Prior to meeting him I had never tried food from these cultures and now these two countries are on the top of my culinary list. As much as I love Greek food (clearly my last three posts have been very Greek-centric) I have to say that if I ever was on death row, Pho would be my last meal.


When we first moved to Philly a friend of my husband's recommend a restaurant simply called "Vietnam." After we first ate there it was all over for us. We quickly became converts and started a weekly ritual of ordering two Phos and one mixed platter of appetizers to share. When we moved back to New York City I started jonesing for Vietnamese and the hunt began! After some trial and error, and a bit of Internet research, I found Xe Lua. Xe Lua is one of my favorite restaurants in NYC, if not my favorite, and I ritually frequent this establishment once a week.


While other's consider Saturday brunch a time for Belgian waffles and eggs Benedict, I consider it a time for green papaya salad, vegetarian spring rolls, barbecued quail and Pho. I have tried to make Pho at home, and even tried a vegan version, but it never comes out the same. Until I get the anise, clove, cinnamon and beef stock proportions right, I will continue to surrender myself to Xe Lua.


I do not want to discredit other Vietnamese restaurants, because I clearly have not tried them all, but why try any other place else when the service at Xe Lua is friendly, the atmosphere inviting and the food exceptional! I am a creature of habit and this place is a mainstay in my weekly routine. Aside from my own converts that eat frequently at Xe Lua, the restaurant is also filled with native Vietnamese. In my book that is the sign of a great restaurant and I hope you feel the same!


Below is the link to Xe Lua's website. Although I fought with idea of releasing their secret location, I finally decided that the world, and at least New York, would be a better place if more people ate at Xe Lua.


XE LUA
86 Mulberry Street,
New York, New York
(212) 577-8887

Sunday, May 9, 2010

Perfect Greek Salad


Greek food is the perfect example of why less is more and why the quality of the ingredients makes all the difference in the world. Last week after watching an episode of “The Best thing I Ever Ate,” my husband asked me what my favorite dish was, and the things that came to mind were sea urchin, octopus, tomatoes and fondue. It was an interesting exercise in self-examination, because I realized that my favorite dishes are often the simplest. One of my other favorite things to eat is a Greek salad. Not the one you get at diners or your average Greek restaurant, but the one they serve in Greece. The simple one, the one without radishes, anchovies, dolmades or lettuce. Yes, lettuce, you heard me correctly, there is NO Lettuce in a Greek salad.

Now don’t get me wrong, Greeks like lettuce and in fact we have many salads and dishes with leafy Greens. It is just that lettuce has no place in a classic Greek salad. I have pondered why lettuce appears in the Greek salad west of the Atlantic and have come to two conclusions. First, lettuce helps to keep costs down since it acts as filler and two, restaurant owners were probably afraid that if lettuce wasn’t present, customers wouldn’t think it was an actual salad. You would think that something as simple as a Greek salad would not need a lengthy post or recipe, but I can assure you that other than in Greece, there are very few places where I can get a decent Greek salad.

What makes this salad difficult is finding the right ingredients. Your tomatoes need to be perfectly ripe, your olive oil needs to be the best and your black olives cannot come out of a can. Kalamatas are preferable, but I have gotten away with Nicoise. In Greece you can order either a tomato-cucumber salad (Anguro-Tomata) or Greek village salad (Horiatiki). The difference is that the latter has cheese and olives, but other than that they are the same.


Greek Village Salad a.k.a The Greek Salad

2-3 super ripe tomatoes cut into eights

½ an English or seedless cucumber halved, then sliced

½ small red onion sliced

4 oz Feta either crumbled or in a large slice on top (omit Feta to make this a vegan entree or side)

10-15 Kalamata olives, depending on your taste and the size of the olives.*

1/3 cup olive oil

2/3 cup vinegar (I like a lot of vinegar which will add to the

dipping experience which is described below)

1 tsp Greek or Mexican oregano

Kosher salt and pepper to taste

Add the tomatoes, cucumbers, red onions, black olives, salt, pepper, ½ of the oregano, olive oil and vinegar to a serving bowl and toss. Top with feta and add the remaining oregano on top.

*My grandmother also will include thinly slices light green peppers if they are available.

Serves four as a side or 2 as a main.

Serve with crusty bread, which you can dip in the juices that collect in the bottom of the bowl. This is not rude and considered proper form at the dinner table. In fact we frequently eat out of the same bowl and don’t bother to serve the salad on individual plates.

For a variety of bargain-priced, quality feta, olive oil, olives and oregano, go to Titan Foods in Astoria (http://www.titanfood.com/). When I lived in Miami I used to ship from them and even with the shipping included it was still cheaper than buying local. If you are feeling adventurous and want to try other Greek products, feel free to email me for other recommendations on what to buy.


Enjoy!


Tuesday, May 4, 2010

My Mother's Spanakopita Recipe


The spanakopita has made its appearance on Greek diner menus since the 1970s and is almost as famous as the gyro or moussaka. Literally translated, spanakopita means spinach pie, so the ones with spinach and feta are technically spanakotiropita or spinach-cheese pies. I call them both spanakopita, even though it is technically not correct, because there comes a point when the pronunciation becomes too complicated, even for me. These little savory bundles can be filled with just cheese (tiropita), zucchini (kolokithopita), meat (kreatopita), onions (kremithopita) and one of my favorites, sauerkraut (armiopita). In addition to the savory pies, are the sweet ones, like bougatsa (sweet cheese pie) or galaktobouriko (milk pie). The options are limitless.

The recipe below was taught to me by my Mother, who was not Greek, but Finnish-American, and in honor of Mother’s Day I am sharing the recipe with you.

Linnea's Spanakopita

2 Tbs olive oil

1 packet frozen chopped spinach (or 1 lb of fresh spinach)

1 small red onion chopped

½ pound good feta

1 pound ricotta cheese (the 15oz container is fine. In Greece we actually use mizithra cheese, so if you can find that, better yet.)

2 eggs beaten

1-2 Tbs. chopped dill (I use a scissor)

Pinch of nutmeg (I like to grate my own, about 6-8 sweeps on a microplane grater)

Fresh ground black pepper

Stick of butter for brushing the phyllo

Packet of phyllo dough

Pastry brush

1. In a frying pan heat the olive oil and sweat the onions. Add the spinach and cook until the excess water has evaporated. (If using frozen spinach either defrost it first or add a little water to the pan to get it started).

2. In a large mixing bowl add the ricotta and crumble in the feta. Add the black pepper, dill and nutmeg, taste and adjust the seasoning. Because the feta is salty I never add salt, but this is up to you. I really like to taste the nutmeg, but it should be understated. I use a little dill because as it cooks the flavor becomes more pronounced, but feel free to add more. As you make this dish a couple times you will figure out what works for you.

4. Once the flavor is right, beat the eggs and add them to the mixture. Stir to combine.

5. Make sure the spinach has cooled and then add to the egg cheese mixture. If the spinach is still super moist strain it in a paper towel lined colander. (Sometimes I make the mixture the night before to save time. When I make the filling the day before I leave the eggs out until the next day).

6. Butter a large sheet pan and then lay down a single layer of phyllo. Butter the phyllo and then add another layer. Repeat until you have a layer of 10. Add the spinach cheese mixture and spread evenly. Top with another single layer of phyllo and then brush with butter. Repeat until you have a top layer of 10. Cut away any excess phyllo.

7. Bake at 375 for 40 minutes or until the top is brown. Before you bake you can also sprinkle with a little fleur de sel or kosher salt.

Important Note: Most phyllo (unless fresh) is in the freezer section of your market and requires you to defrost it overnight and then leave it out at room temperature for a couple hours before use. Don’t plan on making this recipe tonight unless you happen to have defrosted phyllo on hand.

Here is a link on how to make triangles with the phyllo dough.

http://greekfood.about.com/od/makephyllosweetsavory/ig/Folding-Triangles/

If using store bought phyllo just cut it in thirds or half and then follow the instructions. Just remember to keep the phyllo you are not using covered or it will dry out.

My Greek Yia Yia (Grandma) taught me how to make homemade phyllo dough and when I get better at blogging I will post the recipe with a “how to” video. Lets just say it includes a long wooden stick and plenty of elbow grease. Home made phyllo is more rustic, but I cannot say that I prefer one over the other. For dinner parties I make little triangles, and when I am lazy I make one large sheet pan. Both taste just as good, but the triangles are better if you are serving a crowd. The homemade phyllo dough from Poseidon bakery in Hell’s Kitchen, NYC, is worth the trip.

If you are vegan or just fasting for lent, I would be happy to provide you with my dairy/egg free recipe (which my husband says is just as good) upon email request.

Kali Orexi!

Saturday, May 1, 2010

GREEK EASTER


Despite my aunts' protests, there are many things about the movie, “My Big Fat Greek Wedding” that remind me of my family. Although we do not have doric columns in front of our homes and have long since removed the plastic from the couches, we do have cousins with all the same name and spit on each other to ward off the evil eye. One of my favorite things about being Greek, is Greek Easter and with only 359 days to go, I figured what better way to build your anticipation than show you some images of Greek Easter past.

Greek Easter represents what Greeks do best; cook, eat, dance and drink. Not necessarily in that order since the drinking can frequently start at 7am while my uncles truss the lamb and get it ready for the spit. By the time I arrive the party has already started and the tidbits of lamb and grilled haloumi cheese are already being passed around. It is an event not to be missed. Easter breads (“Tsoureki”) are kneaded days in advance and the eggs are dyed red on the Thursday before Mass. After 7 weeks of fasting, appetites are wet with anticipation and then the feast begins! Although the food is important, I do want to emphasize that it is the gathering of family and friends that makes this such a special day.


In order to understand how my family spends Greek Easter you need to first understand that my family is fun. Not regular fun, but super fun. My aunt Kathy will start dancing the second the guests arrive and then my aunt Effie will inevitably start breaking plates. This year Uncle Diamond broke her Pyrex dish and she wasn’t too happy about that, but in the end we all laughed and tried to hold onto our wine glasses in fear that they would be next on his list. By the time night falls, most of us are stuffed, hung-over and desperately in need of a nap.


In an effort to recreate this fabulous event for some of my American friends, I broke fast early this year and made a mini Greek Easter of my own on Easter's eve. In honor of this great day, I made roast lamb with lemon potatoes, spanakopita with homemade phyllo, Greek green salad, tsoureki, and kourambiedes for dessert. As with all Greek dinners, feta and olives were served, as was tsipouro and ouzo. Since Tsoureki bread is indicative of Greek Easter I have posted the recipe with a link with instructions on how to dye the eggs red below. The recipes for kourambie and spinach pies aka spanakopita, which are not inherent to Greek Easter and can be served on other holidays, will be posted shortly. If you are in desperate need of any of the referenced recipes feel free to email me.

“Tsoureki” Greek Easter Bread Recipe

4 cups flour (plus more for dusting)

1 packet (or 2 ½ tsp active dry yeast)

1 tsp salt

2/3 cup sugar

3/4 cup milk

2 eggs beaten

1 stick (8 Tbs. unsulated butter)

1 ½ tsp orange zest

1 tsp Mahlepi (if you can find it)

¼ tsp mastic powder (http://mastihashopny.com/)(or at Indian Markets)

1 egg yolk combined with tbs milk,

1-2 red-dyed hard-boiled egg

Sesame seeds or toasted sliced almonds to decorate

  1. Warm the milk in a small saucepan to about 105 – 110 degrees and to a bowl. Add the yeast to activate. (You will know it is working when bubbles start to form).
  2. Sift dry ingredients and set aside.
  3. Melt the butter and after it has cooled add the two eggs and orange zest.
  4. Combine the wet ingredients in a stand mixer with the dough hook attached.
  5. Slowly add the flour until it is all incorporated and let the dough hook knead the bread until the mass cleans the sides. Continue to knead for about 5 minutes. Turn out onto a floured surface and need for another 2-3 minutes.
  6. Place the dough in a warm, draft free spot covered by oiled plastic wrap and allow it to rise until it has doubled in size.
  7. After two hours (or more) divide the dough into three parts and roll out into long ropes. Secure the ropes together on one end and then braid them. Let the bread rise for a second time in a warm draft free place for about one hour.
  8. Preheat the oven to 350 and make sure the oven rack is in the middle.
  9. Immediately before putting the bread in the oven, brush with the egg milk wash, sprinkle with either the almonds or sesame seeds and insert the red egg into the desired location (see photo).
  10. Bake for about 30 minutes until a deep golden color is obtained. Check after 20 minutes. When you tap the bottom it should sound hollow.

This year I divided the dough into two and made two mini loaves (see above), one straight and one circular, but use your discretion and creativity. There is no right or wrong way. As long as the red egg makes its debut, you have successfully made a Greek Tsoureki! For directions on dying the eggs, follow this link:

http://greekfood.about.com/od/greekcookingtips/ht/redeggs.htm

I found it necessary to add a little red food coloring to deepen the color, but the results were spectacular.

Tsigourisma - the breaking of the eggs for luck
Kali Orexi!